Setup

Separate the cards into three piles: Locations, Units and Starter Units. Starter units are identified by the orange nameplates and include Rabble, Grunts, Harvesters and MBTs. Support units are shuffled into the units deck. Shuffle the Locations, and set them face down between the two players to form the location deck.
Deal 2 Rabble, 2 Harvesters, 2 Grunts and one MBT card to each player. Each player shuffles these to form their personal starting deck of 7 cards. Shuffle the remaining (non-
starter) unit cards to form the unit deck and set it to the side. Players roll off, with the highest roll taking the first player token.

Gameplay

The game starts with a conquest phase. Each player draws 5 cards from their deck. If their deck does not contain 5 cards, they draw any cards remaining in their deck, then shuffle the discard pile to form a new deck, and draw from the new deck until they have exactly 5 cards in hand.
Take the top 3 cards of the location deck and place them face up in a line between the players. Place a number of resource tokens on each location equal to the amount specified on the location card. Occasionally the number of resources a card is worth will change when certain conditions are met. This will be indicated in the card text.
Starting with the player who has the first player token, players alternate deploying (playing) units from their hand, one at a time, to their side of one of the available locations. When a unit is deployed, resolve the steps below, with the player deploying a card being the “Attacker” and the other player being the “Defender.”
When these steps are complete, the other player takes a turn, and must play a card, alternating until each player has played 5 cards, and the round is over. Damage counters are not removed until the end of each round, and after each step, if a unit has damage counters on it equal to or exceeding its armor value, it is destroyed and placed face-up in its players’ discard pile.

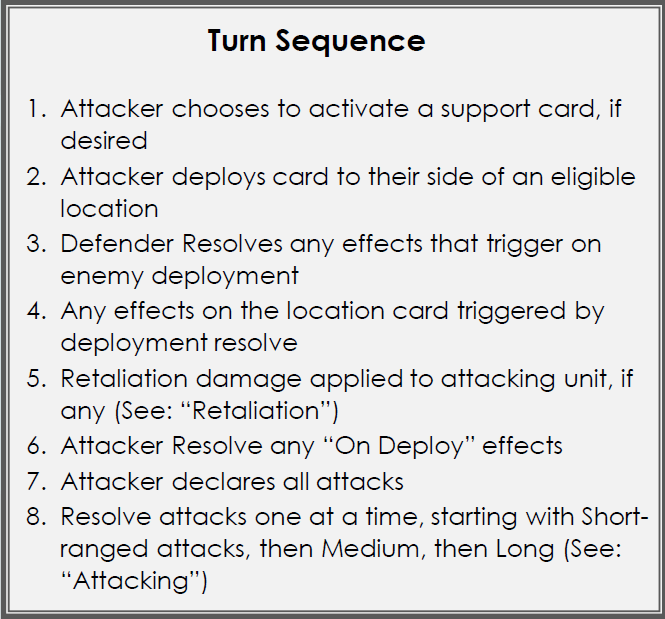
This is the sequence that events occur during a turn. Note than in most cases, only a few of these steps will be relevant.

The only step that will happen each turn is step two, as each player must deploy a card for their turn.

Attacking

Each unit has up to three weapons that it may attack with. Each weapon has a dice value, and letters indicating if it can be used against enemy units at Short, Medium, or Long range. For example the Chain Gun has a dice value of 2 and may be used to attack an enemy unit at Short or Medium range.

Short range attacks are allocated to enemy units at the same location as the attacking unit. Medium range attacks are allocated to enemy units one location to the left or right of the attacking unit’s location. Long range attacks are allocated to enemy units two locations to the left or right of the attacking unit, (meaning that a unit in the middle location is not at Long range to any other locations). A unit may attack with all of the weapons it has when it is deployed, as long as there are valid enemy units to target.

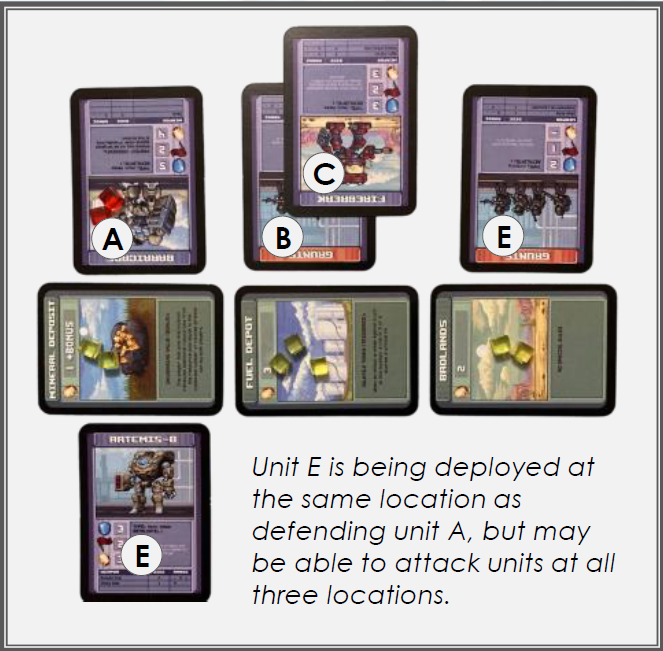
In the example shown, Unit E is being deployed. It may allocate Short range attacks to Unit A, Medium range attacks to units B or C, and Long range attacks to Unit D. Each weapon is only allocated to a
single enemy unit, even if it has the option to be used at multiple ranges. However if Unit E has multiple weapons that can attack at range M, it can allocate each of them to separate units at Medium range if desired.

After attacks are declared, resolve the die rolls from Short to Long in that order. Roll dice equal to the dice value for each weapon that has been allocated to each unit individually. Unless a special rule on a unit or location specifies otherwise, a roll of three or better (3+) on an attack die is considered to be a successful attack. Regardless of any other special rules that may be in play, a roll of 1 is never considered a successful attack. Place damage counters on the target unit equal to the number of successful attacks (the number of dice showing values of 3 or more).


If the die rolled is an unmodified 6 (not including any bonuses to the die roll that the unit may have), the result is considered to be a critical hit, and the hit from that die places 2 damage counters instead of 1.


Example: A 3-dice attack with the results 4, 3 and 6 would place 4 damage counters on an enemy unit – the 4 and 3 are both hits and deal 1 damage each, while the 6 is a critical and deals 2 damage.

Retailiation

While most units only deal damage once – when they are played - units that are skilled at close-quarters fighting or can dig in to defend a location deal damage when an enemy unit is deployed there. When an unit is deployed at a location where the defending player has one or more units with “Retaliate X”, the attacking unit receives a number of damage counters equal to the highest value of X among all enemy units at that location. No dice are rolled, the damage is automatically applied. (As this can destroy an attacking card before they allocate any of their own attacks, it is a good idea to try and destroy any units with retaliate from Medium or Long range, before deploying any of your units to the location they are defending)

Capturing locations

Once the last card has been played and all attacks and abilities have been resolved, the combat phase ends. Add the combined capture value of all units at each location for each player, starting with the location closest to the location deck and working outwards. The player with the highest capture value (flag) at a location is considered to have won that location, and takes the resource tokens from that location to add to their resource pool. In the event that both players have the same capture value at a location, that location is tied and no player takes any resources from it. Any remaining units at each location have their damage counters removed and are placed in their respective player’s discard pile.


If one player has won more locations than the other (either because they have won two of the three locations, or have won a single location and the others are tied) they are considered to have won the round. They take one of the location cards and place it on their side of the board to indicate a round won. If both players hold the same number of locations, neither wins the round,

The first player to win three rounds wins the game.

Acquisition Phase

Once all of the units have been deployed and locations won, play moves to the acquisition phase.


Take the top 5 cards of the unit deck and lay them out face-up for both players to see. These are the cards available for purchase. Starting with the player holding the first player token, players alternate purchasing units from those available with the resources in their resource pool. When a unit is purchased, do not replace it.


If a player does not want to purchase one of the units available, they may pass. If they do, the other player may continue to purchase units until they choose to pass. A player may not decide to purchase units again if they have already passed.
When a unit is purchased, place it face-up in that player’s discard pile. (with the exception of support cards, see below) They will be shuffled into the new deck the next time that players deck runs out of cards.


When both players are finished buying units, remove all remaining cards from the units available to be purchased, shuffle them, and place them on the bottom of the unit deck.
Pass the first player token to the other player.

Support Units

Support units function differently from front-line combat units, providing a known benefit that you can plan around from round to round. When a support card is purchased (or acquired through the bonus effect of the warehouse card), it does not get placed in your discard pile, but rather face-up in front of you. Each support card has an ability that may be activated at the start of your turn during the conquest phase, before you have played any cards.


Each support card can only be activated once per conquest phase. Turn the card sideways once its ability has been activated to indicate that it cannot be used until the next conquest phase. More than one support card can be activated at the start of your turn, in any order you wish, however you may never have more than one of the same support card in play in front of you at any time. This means you may not purchase a support card you already have, and must elect not to take a duplicate support card through the Warehouse bonus effect.

Ending the Game

The game ends when a player who has already won two rounds (and therefore has two location cards collected in front of them) wins a third conquest round. That player has secured their place in the IRON FUTURE and is the winner.


(If another game is to be played immediately afterwards, the player who did not win is given the choice to start as the first player or not)